Documentation Home > Exchange Custom Sender
 Verifying the Exchange Agent Installation
To verify that the Exchange Agent has been installed successfully, open
the Exchange Management Shell and execute the command
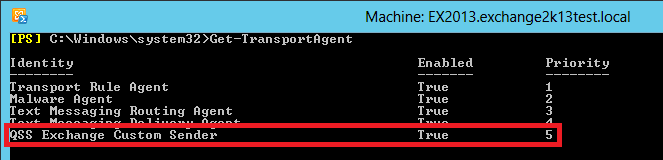
Get-TransportAgent
. Verify that the QSS Exchange Custom Sender
agent is shown in the list and is enabled.
If the transport agent is not installed, re-run the InstallExchangeAgent.ps1 PowerShell script which is installed in the %ProgramFiles%\Quantum Software Solutions\Exchange Custom Sender Exchange Agent folder by default.
You can also run the commands shown below to manually install the Exchange Agent. If you installed to a non-default directory, be sure to insert the correct folder path inside the quotes on the first line.
cd "$env:ProgramFiles\Quantum Software Solutions\Exchange Custom Sender Exchange Agent"
Install-TransportAgent -Name "QSS Exchange Custom Sender" -
TransportAgentFactory
"QSS.ExchangeCustomSender.ExchangeAgent.CustomSenderAgentFactory" -
AssemblyPath
"QSS.ExchangeCustomSender.ExchangeAgent.dll"
Enable-TransportAgent -Identity "QSS Exchange Custom Sender"
Restart-Service MsExchangeTransport
If you install the transport agent manually, you also need to make sure that
the NETWORK SERVICE account has write access to the
%ProgramData%\Quantum Software Solutions folder.
If you have other Transport Agents installed on the Exchange server, it may be necessary to adjust the priority of the QSS Exchange Custom Sender agent. By default it is installed with the lowest priority. We recommend sending a test message to verify if adjusting the priority is necessary in this case. If it is unsuccessful, try increasing the priority by setting it to a lower number, so that it appears immediately after the built-in Exchange Transport Agents which are shown above. You can use the following command to set the priority of the Exchange Agent:
Set-TransportAgent -Identity "QSS Exchange Custom Sender" -Priority 5